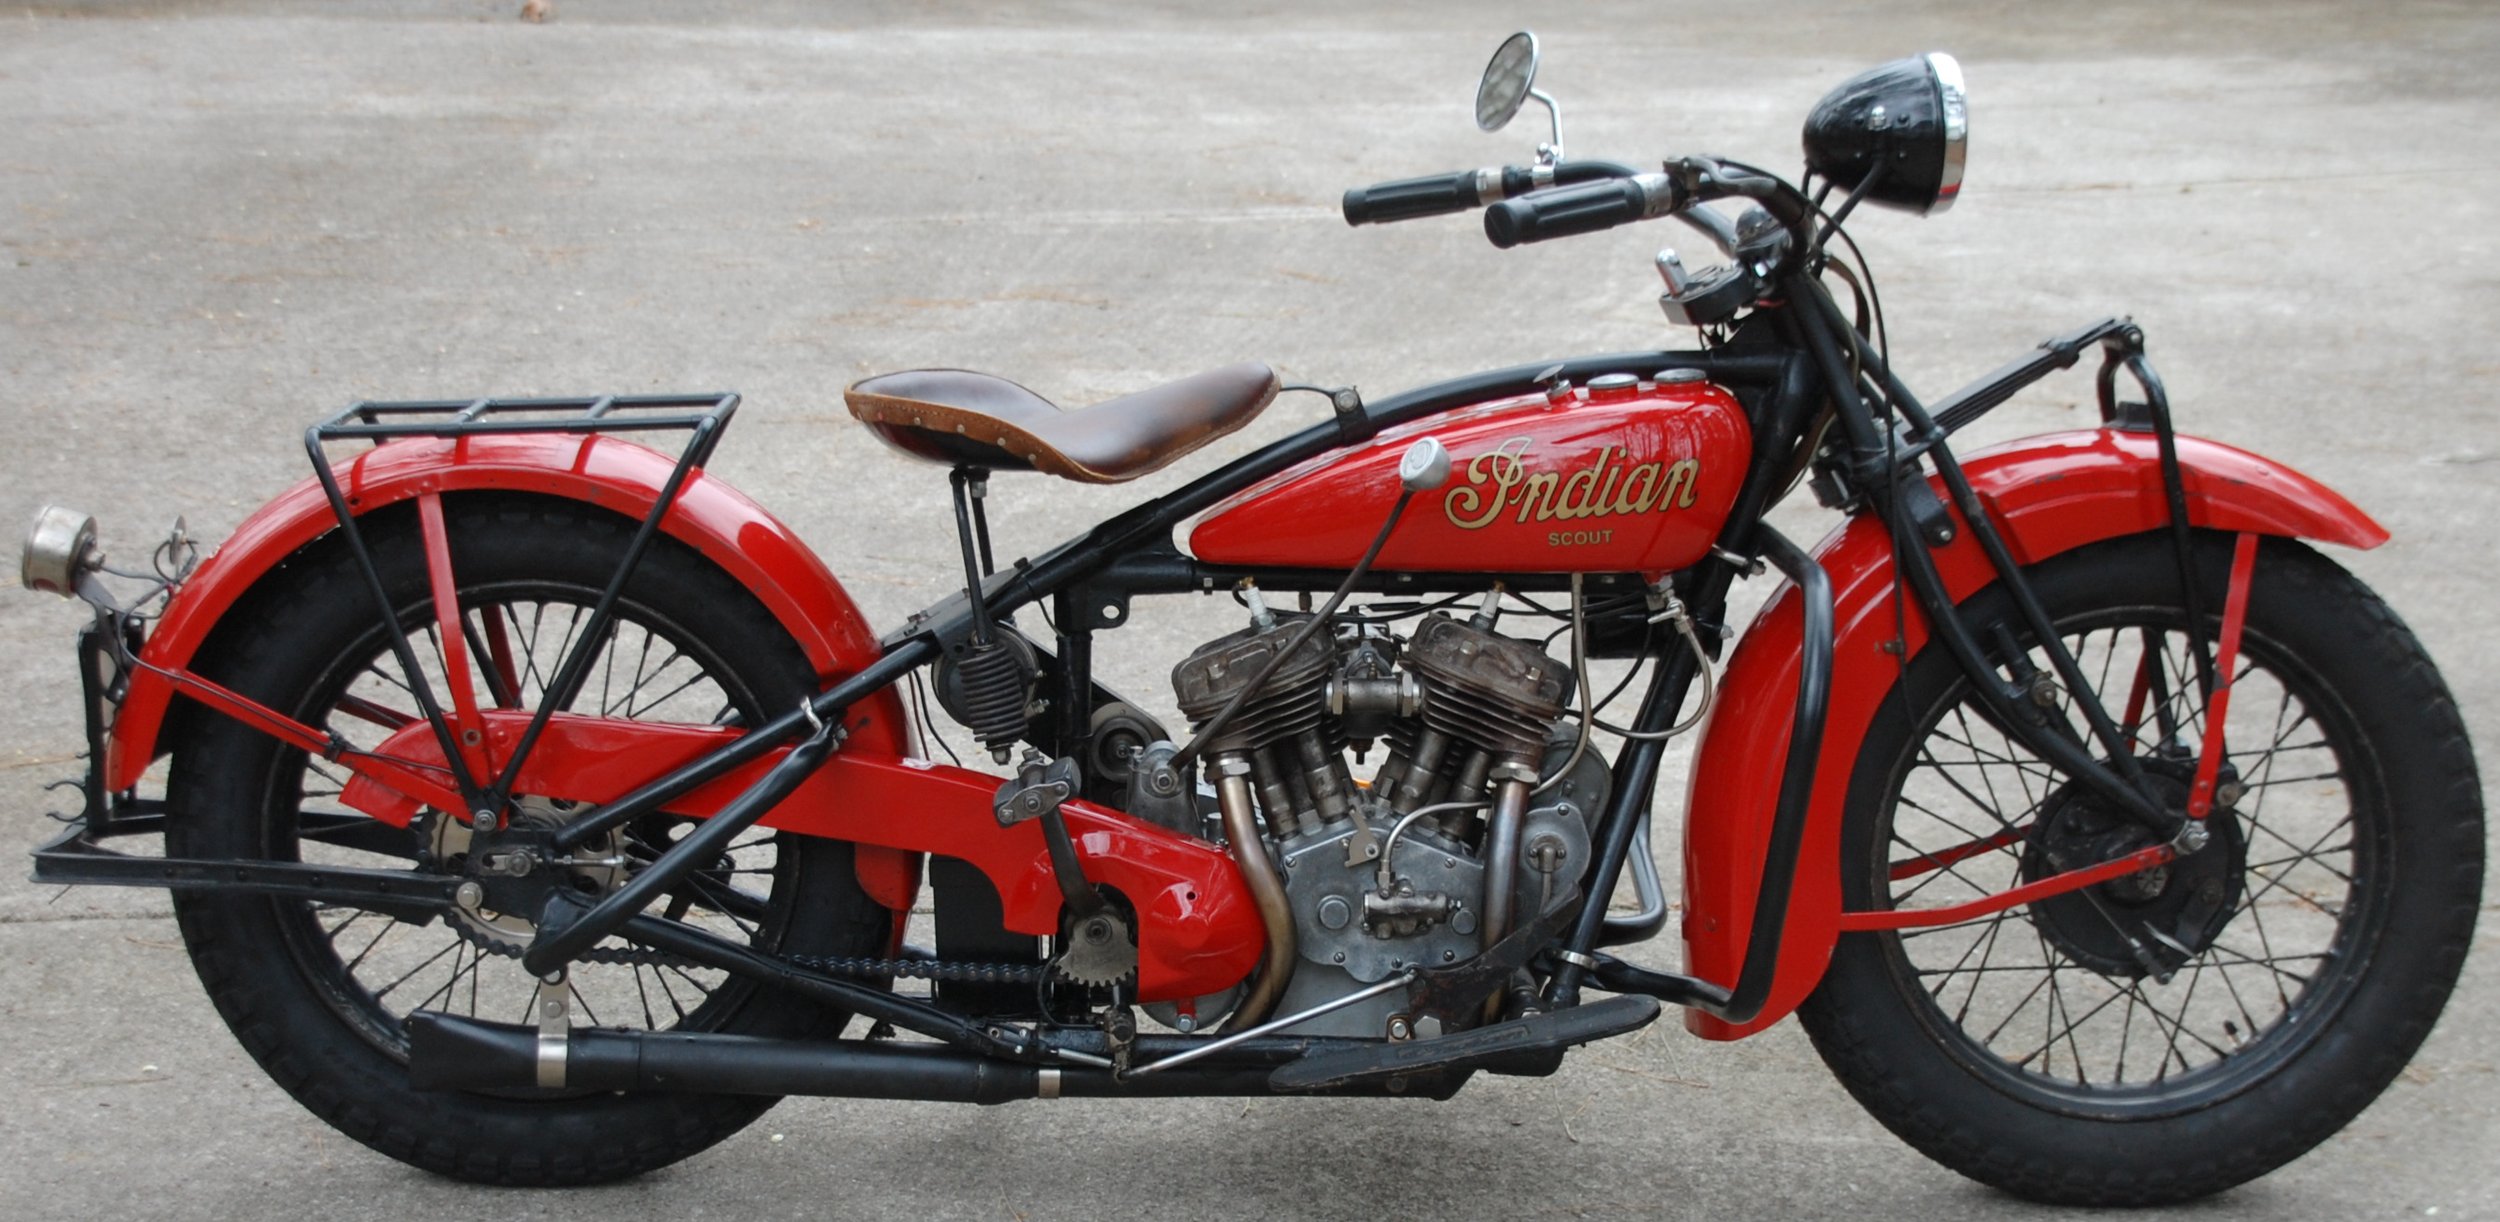
Ready for another 95 years!

Since the May ‘22 update on my ‘29 Scout project, I’ve continued to make slow but steady progress.  Last update I had completed a short ride and was trying to figure out how to make the original 1-piece chainguard and exhaust be installed at the same time.  Either one or the other was possible, but both at the same time was a real challenge.  After lots of attempts, I finally found the magic sequence that worked for me. Fortunately I wrote it all down last year because I got to do it again a couple of weeks ago - and it worked again!


My Scout came with a Splitdorf DU-5 generator that had been modified with an external regulator.  I removed the regulator, and verified that the generator motors, but I have not found anybody who’s in the business of restoring these models.  I looked into replacing it with a modern version from a source in Portugal, but decided to go with a “total loss” electrical system for now.  The generator is in place for looks, but not connected nor is there a belt driving it.  I installed a pair of Power Sonic PS-632 6 Volt rechargeable batteries, a 6 volt LED board in the taillight that I got from England, (not the original light, but a cheap vintage unit I picked up at Denton), and a LED headlight bulb from Paul Benassi to replace the BA20D that was in place.  Paul Benassi was very helpful in finding a bulb that would fit into the can.  With my batteries only powering the two LEDs, I won’t have to worry about a generator for a while.


My Scout came with an Indian-stamped Linkert M7 carburetor.  I used Cecil’s technique for tuning the carb with great results, and it’s quite simple:

  1. Warm up engine

  2. Set spark at full advance

  3. Turn low speed needle in ¼ turn at a time until engine falters or dies, then back out 5 clicks

  4. Set spark half-advanced

  5. Blip the throttle

  6. If the engine coughs/falters, hi-speed needle is set too lean

  7. If the engine backfires, hi-speed needle is set too rich


After seeing Dorsey’s melted WL piston, I decided to invest some time to ensure my intake was in good condition.  I fabricated a leak tester from a piece of flat steel and a tire valve.  I ground the mating surfaces of the carb, manifold, and carb spacer on sandpaper taped to a sheet of glass (flat surface) with a bit of kerosene for lubricant.  When I had everything reasonably flat, I mounted everything up with new gaskets and YamaBond, dropped the valves, sprayed everything with soapy water, and started pumping the bicycle pump.  The only air I could get to bubble out was around the mounting holes of my tester.  I added some O-rings to the fasteners, and got the same result.  I’m going to say that’s good enough, and my intake is pretty tight.  I’ll monitor my plugs closely as my rear plug had been a bit darker than my front.  Might try different plugs to see if I can even them out.  I’m running Champion D16s (cold plugs) at the moment.


I’ve put a little more than 200 miles on the bike so far.  Checking oil before and after each ride, adjusting the oiler, tightening fasteners, etc.  Knock on wood, it’s been without any serious issues so far.  I had my dash light nut vibrate loose - that’s the only thing that’s gone wrong so far.  Late last year I was asked to bring the Scout to the Barber’s Vintage Festival for the Century Parade.  I know it’s not 100 years old, but close enough. During the lunch break for the racers, Erik, myself, and 6 others were introduced - oldest bike to newest - and rode one lap of the Barber Motorsports Track.  My Scout performed like a champ.  Afterwards we parked in front of the museum and talked to folks who came to look at our machines.  One of the photographers caught me having the time of my life.

After the Barber’s ride, I decided to take the winter to address a couple of issues.  I was running the chain and sprockets that came with the bike.  Close inspection revealed that they were severely worn out.  I also figured out from the Rider’s Instruction Book that the 18 & 36 tooth sprockets that were in place were appropriate for a sidecar setup.  I obtained and installed new 21 and 36 tooth sprockets and NOS Duckworth chain.  I’m looking forward to seeing how the bike performs with gearing more appropriate for a solo setup.

The last winter project was to decide about paint.  My chainguard was in primer when I bought the bike, and it had a nasty gash through the section that wraps around the frame.  The tank was leak-free, but had previously been coated with “Kreme”.  Problem was that the oil tank was also coated, and the inlet for the hand oil pump was blocked.  There were runs of Kreme on the outside of the tank, the paint was flaking off, and there were remnants of stickers bonded to the paint.  I looked into a replacement tank from India, and talked with a restorer in California who would completely disassemble and re-solder my tank.  In the end, I decided to strip the Kreme out of the tank and see what I had to work with.  The plan was to use a 2-part coating from Caswell (Dragon’s Blood) at the advice of a friend who had good luck with it.  I learned quickly that hot acetone expands significantly and it’s near impossible to keep it inside the tank.  I did multiple rounds of soaking, scrubbing, and sloshing metal screws around the inside. I pulled gobs of half-dissolved Kreme out of both tanks, but could not get it 100% clean.  I finally decided to ship the tank to Richard Gaudio in Florida (dixchief@gmail.com) for professional stripping and coating with Red-Kote.  That was a good decision.  Richard verified the integrity of the tanks, and did a fantastic job of getting the Kreme out, and even Red-Koted the seams inside the oil tank.  I tracked down the local painter who had done some quality insurance work on a BMW bike for me through the local dealer.  He agreed to paint my tank and chainguard (and repair the hole), apply tank decals, and match the (incorrect) red color existing on the fenders.  I decided to not have pinstripes done as I wanted to maintain the condition of the fenders.  He wasn’t quick, but very conscientious.  He wasn’t satisfied with the first set of decals he applied, and called me in to show me the issues.  I bought a second set of decals which laid down much better.  He nailed the color match, and I’m pleased to have retained the “as-found” color of the bike.  It’s pleasing to me to have most of the paint with it’s original patina, but a good-looking tank with the Indian logo.

At this point, I’m ready to add oil and gas and get her back on the road.  I’m going to claim that I’m “done” at this point, as I have no other upgrades planned.  I know that it will always be a project, and I’ll be wrenching on it until I die.  It’s been such a satisfying experience to bring the old girl back to life.  I’ve kept in touch with the previous owner, and she’s pleased as well.
My 101 Scout Survivor…..

John Lindberg

SMC Huntsville


I’ve been hooked on motorcycles since my Honda Trail 70 in the late 1960’s.  I’ve been through several, Harleys, Hondas, BMWs, and one Kawasaki.  My interest has gravitated to older, simpler machines.  I previously owned a 1939 Harley UL, and a 1956 BMW R50.  The Harley was a barn find back in 1987.  I stumbled onto it at Motorcycle Classics in Huntsville, AL.  Gordon Barbee, the owner, was a wealth of knowledge, and spent many hours answering my questions about the treasures in his shop.  I remember being amazed the first time I saw the finely machined linkages and U-joints on an early Indian.  That flathead came home with me, accompanied by several spare parts, HD tools, and a police siren.  Unfortunately, a layoff forced me to sell her - a decision I still regret.  I hope she’s on the road somewhere.  The BMW was very refined and a great ride.  My son Alex and I enjoyed working on it together, and his dream was to attend community college to become a car mechanic.  Alex died at age 16, and I lost my interest in working on the R50.  It too has found a new home.

I devoured a copy of Harry Sucher’s “Iron Redskin” many years ago and was always enamored of the 101 Scout.  The look, the simplicity, the rarity, and the famous ride quality made it seem like the pinnacle of the Indian lineup in my eyes.  I could never afford one back then, but times change.  My search for a 101 Scout turned up a lead in Kentucky - only 350 miles away.  The ad had only a few dark cellphone photos, but it was enough to show that this was a fairly complete motorcycle.  A phone call to the owner revealed that Mr. C was an avid collector with a stable of Indian Fours and other rare examples.  His death three years ago left Mrs. C with several shops and buildings full of equipment, parts, and motorcycles to sell.  I drove up that weekend with an empty trailer in tow.  Mrs. C was a gracious host, allowing me to look the motorcycle over thoroughly and answered my many questions.  Mr. C had started on a restoration of the Scout, and it was still on the lift in his garage.  A new battery box had been installed, and the generator & brackets, headlight & brackets, muffler, horn, and air cleaner were missing.  Mrs. C relayed that the motorcycle had been started and ridden about 5 years ago.  

We agreed on (her) price.  Mrs. C was deeply involved in the hobby with her husband and knew the value of the Scout.  In briefly looking around the garage, we located the headlight & brackets, generator, and Klaxon horn.  Mrs. C is having a friend help go through the garage this summer and I’m hoping my muffler, air cleaner, and generator mount & belt guard show up (still hoping as of this date…).  Mrs. C also included a copy of the 101 Association’s Shop Manual which has become my new favorite reading material.

The Scout sat in my garage, awaiting my retirement, and a decision about how to proceed.  I smiled every time I saw it sitting there.  I did a good visual survey of the condition.  Everything looked straight and complete.  The tank and fenders had obviously been repainted a nice bright red, the sticker on the side of the tank had disintegrated.  The tank was solid and had some old oil and gas inside.  The hand oil pump leathers were shot and the tube from the pump to the engine had been cut & sealed.  Nothing was attached to the compression release.  Wires were dangling, etc.  Engine number is DGP 3335. The two photos below show the condition of the bike as I purchased it.

1.jpg
2.jpg

When the COVID-19 mess arrived, I found myself working from home with extra time on my hands.  I decided it would be a good time to start rebuilding the Scout.  I disassembled everything, taking careful notes and photos.  I decided to remove the patina - remove the layers of grease and dirt - which turned out to be the right decision.  I found a lot of “tractor mechanic” repairs, including stacks of washers to make up for correct spacing, more square nuts than I could count (which I am retaining where possible), and several broken parts and poorly-assembled parts (cotter pins without washers underneath them, too-short/too-long bolts, etc.).  A couple of my favorite discoveries included an bolt twisted off in the case - another bolt was passed through the primary cover with no thread engagement - held in place with silicone, and a substantial length of fence wire wrapped around the rear hub.  

3.JPG

I took the bike completely apart, stopping when I had a set of cases with rods sticking out of them.  In June I took a road trip to Torrington, CT to meet up with Tim Raindle, who took over for George Yarocki - the 101 Scout Guru.  Tim and I finished disassembling the lower end, and took inventory of the other motor components.  Luckily, most everything was in good enough shape to be re-used.  Tim is having the baffles welded back into place - they were removed by some previous owner - and is having one of the magneto mounts re-welded - a victim of an earlier crash that is also evidenced by some frame repairs.  While in CT I saw photos of SMC-member Doug Jones on the wall from when he and George rebuild his ‘29 Scout.  I also learned that my motor is a ‘28 in a later frame with even later handlebars.  No surprises to find that a 90 year-old motorcycle has been modified along the way.  I was also able to visit 101 suppliers Randy Walker and Kent Thompson and acquire some of the missing pieces I needed.

Since that trip, I have sent the magneto off to Mark’s in CT to be rebuilt, the Linkert M7 body is currently at “Into the Wilderness” having new throttle shaft bushings pressed into place, the petcock has been rebuilt by Conrad Lytle, and the seat has been recovered by Heather’s Leathers.

I am slowly starting to reassemble the pieces.  As you can see from (photos #4 and #5), she’s back on two wheels.  A lot of parts are temporarily installed as I make sure everything fits together.  I have a list of “puzzles” in my notebook that I’m still working to resolve.  Hopefully I will be heading back to CT in the not-too-distant future with my rolling chassis to reinstall the engine and make the adjustments and connections to get her back on the road.

4.JPG
5.JPG

I’ll send out an invitation for a “tech-day” at my place in Huntsville when she’s ready to be started and test-ridden.  Hope you can join me for that event.

5/11/22

Time for an update on my (slow) progress.  Thanks for the reminder, Erik.  I continue to enjoy learning about my Scout and working to get her closer to road-ready.  In May ‘21 I trucked her back to Tim’s shop in Torrington, CT.  The welding of the cases (replacing baffles and fixing a broken mounting tab) was successful.  Peter Talabach at Mohawk Garage did the welding, and my understanding is that the early Indian cases are a real metallurgical challenge.  Tim and I spent just short of 2 weeks assembling the motor and transmission.  He’s very methodical, and I learned a lot just watching him.  I was very pleased with the care he took and the patience he had.  Most of the interior components are new - crank, rods, pistons, etc.  We re-used some items where they were in good shape, and fabricated a lot of spacers and bits to get everything aligned properly.  By that time I had the Splitdorf magneto and Linkert M7 (an aftermarket upgrade for the Schebler) ready to go.  By the time I left CT we had the motor running on the test stand.  Really sounded good with no exhaust headers in place.  We also spent some time verifying the integrity of the frame.  Turns out what I thought was accident damage was simply a sloppy job of somebody removing the brazed-on footbrake pedal bracket.  Tim and I reinstalled the motor and transmission in the frame, forklifted it out of his second story shop, and I was headed back home.

I made another parts run to visit Kent Thompson in NH.  He’s been an outstanding help in sourcing parts, including hard-to-find items like the OEM cams we installed.  Kent set me up with the last available (repro) exhaust system and a bunch of nice bits and pieces - most importantly a bolt-on footbrake pedal bracket to replace my missing brazed-on one.  I also ran by Jim Garripoli’s house in NJ and picked up the last set of crash guards he made.

Since I’ve had the Scout back home, progress was temporarily interrupted by another project that showed up (1966 BMW R60/2).   Some aspects of the Scout have been very easy - installing the crash guards took maybe 30 minutes.  Some have been significant challenges.  Getting the hand controls to work smoothly took a lot of time.  I finally figured out that the spirals and blocks were too worn to be reused.  Repro spirals and blocks from Kent solved that problem, referring to photos of Doug Jones’ Scout revealed parts I didn’t know I needed.  Lots of small details have slowly come together.  I was very pleased to find that my gas tank with internal oil tank was leak-free.  Roy Chapman has provided valuable machining expertise, fabricating a bolt for my footbrake pedal, arcing the pads on my brake shoes, and fabricating screws for my carb mount.

Once I got the fuel and oil lines installed, first start was on 20 Nov 2021.  Started right up, idled happily, ran right along in 1st gear on the rear stand.  No fires, I was happy.  First ride was last Thursday, May 5th.  Didn’t go far or fast, but I rode around my neighborhood a bit, figuring out the left hand throttle, right hand spark control and shift, and heel-to-go left foot clutch.  Managed to make it home with no parts missing.  I made some carb adjustments and took her out again this week, managing to run through all the gears and verify that my rear brake still isn’t adjusted properly.  Fortunately the front brake works (kind of…).  Given the brake situation and the fact that I have no lights, I decided to put her back on the stand for a while.  The exhaust system, chainguard, and rear brake are my next challenges.  I’m close on the exhaust system (that missing brake bracket was one of the mounting points), and the rear external brake band adjustment is a bit fiddly.  I’ve got two chainguards - a 2-piece original from Kent and the 1-piece original from my bike.  Not much real estate available between the chainguard and the rear header, so once I’m ready to pull the rear wheel, I’ll play around with that.   Next up will be installation of the electrics.  I’m going to run lights from a battery and not try to get the Splitdorf  generator rebuilt.  Then I hope to be test-riding again, getting the carb and oil pump dialed in.

It’s been a great experience over the three years I’ve owned her, and I’m looking forward to bringing her to one of our gatherings for you to see.